Saturday, 31 January 2015

perform an archetype:create from Eclipse

We can use Eclipse's External Tools capabilities to perform a mavenSW "archetype:create" goal from EclipseSW. We can start by opening the Eclipse External Tools Dialog.
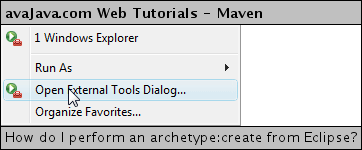
Opening Eclipse External Tools Dialog
I created an external tool configuration with the following settings:
Name:mvn archetype~create
Location:C:\dev\apache-maven-2.0.8\bin\mvn.bat
Working Directory:${workspace_loc}
Arguments:archetype:create -DgroupId=${string_prompt:groupId} -DartifactId=${string_prompt:artifactId}
I used a ~ instead of a : for the configuration Name since Eclipse doesn't allow colons as part of a configuration name. I set mvn.bat (maven) as the Location (tool) to execute. I set the Working Directory to be the Eclipse variable ${workspace_loc}, which represents the Eclipse workspace folder. For the Arguments, I specified to perform the "archetype:create" goal. The string_prompt variables specify that the user will be prompted to enter the groupId and artifactId values when the external configuration is run.
The External Tools Dialog is shown below.
External Tool Configuration
If we run the new "mvn archetype~create" external tool configuration, we get prompted for the groupId value. I entered "com.maventest" and clicked OK.
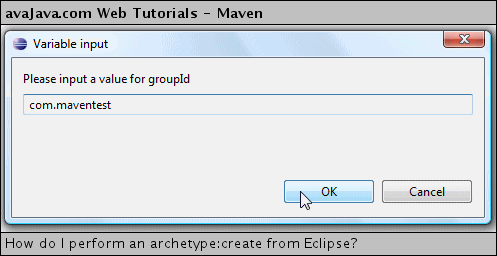
Entering groupId
Next, we get prompted for the artifactId value. I entered "mytest" and clicked OK.
Entering artifactId
In the Eclipse Console view, we see that the archetype:create goal is executed.

Console Output

[INFO] Scanning for projects...
[INFO] Searching repository for plugin with prefix: 'archetype'.
[INFO] ------------------------------------------------------------------------
[INFO] Building Maven Default Project
[INFO]    task-segment: [archetype:create] (aggregator-style)
[INFO] ------------------------------------------------------------------------
[INFO] Setting property: classpath.resource.loader.class => 'org.codehaus.plexus.velocity.ContextClassLoaderResourceLoader'.
[INFO] Setting property: velocimacro.messages.on => 'false'.
[INFO] Setting property: resource.loader => 'classpath'.
[INFO] Setting property: resource.manager.logwhenfound => 'false'.
[INFO] ************************************************************** 
[INFO] Starting Jakarta Velocity v1.4
[INFO] RuntimeInstance initializing.
[INFO] Default Properties File: org\apache\velocity\runtime\defaults\velocity.properties
[INFO] Default ResourceManager initializing. (class org.apache.velocity.runtime.resource.ResourceManagerImpl)
[INFO] Resource Loader Instantiated: org.codehaus.plexus.velocity.ContextClassLoaderResourceLoader
[INFO] ClasspathResourceLoader : initialization starting.
[INFO] ClasspathResourceLoader : initialization complete.
[INFO] ResourceCache : initialized. (class org.apache.velocity.runtime.resource.ResourceCacheImpl)
[INFO] Default ResourceManager initialization complete.
[INFO] Loaded System Directive: org.apache.velocity.runtime.directive.Literal
[INFO] Loaded System Directive: org.apache.velocity.runtime.directive.Macro
[INFO] Loaded System Directive: org.apache.velocity.runtime.directive.Parse
[INFO] Loaded System Directive: org.apache.velocity.runtime.directive.Include
[INFO] Loaded System Directive: org.apache.velocity.runtime.directive.Foreach
[INFO] Created: 20 parsers.
[INFO] Velocimacro : initialization starting.
[INFO] Velocimacro : adding VMs from VM library template : VM_global_library.vm
[ERROR] ResourceManager : unable to find resource 'VM_global_library.vm' in any resource loader.
[INFO] Velocimacro : error using  VM library template VM_global_library.vm : org.apache.velocity.exception.ResourceNotFoundException: Unable to find resource 'VM_global_library.vm'
[INFO] Velocimacro :  VM library template macro registration complete.
[INFO] Velocimacro : allowInline = true : VMs can be defined inline in templates
[INFO] Velocimacro : allowInlineToOverride = false : VMs defined inline may NOT replace previous VM definitions
[INFO] Velocimacro : allowInlineLocal = false : VMs defined inline will be  global in scope if allowed.
[INFO] Velocimacro : initialization complete.
[INFO] Velocity successfully started.
[INFO] [archetype:create]
[INFO] Defaulting package to group ID: com.maventest
[INFO] ----------------------------------------------------------------------------
[INFO] Using following parameters for creating Archetype: maven-archetype-quickstart:RELEASE
[INFO] ----------------------------------------------------------------------------
[INFO] Parameter: groupId, Value: com.maventest
[INFO] Parameter: packageName, Value: com.maventest
[INFO] Parameter: package, Value: com.maventest
[INFO] Parameter: artifactId, Value: mytest
[INFO] Parameter: basedir, Value: C:\dev\workspace
[INFO] Parameter: version, Value: 1.0-SNAPSHOT
[INFO] ********************* End of debug info from resources from generated POM ***********************
[INFO] Archetype created in dir: C:\dev\workspace\mytest
[INFO] ------------------------------------------------------------------------
[INFO] BUILD SUCCESSFUL
[INFO] ------------------------------------------------------------------------
[INFO] Total time: 1 second
[INFO] Finished at: Thu Jan 31 13:35:05 PST 2008
[INFO] Final Memory: 5M/9M
[INFO] ------------------------------------------------------------------------
If we examine the file system, we can see that the "mytest" project was created in the Eclipse workspace. On my machine this was at C:\dev\workspace\mytest
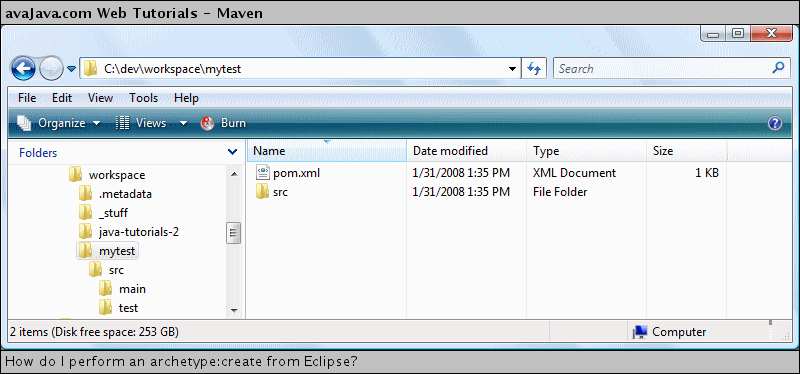
'mytest' project created in C:\dev\workspace
At this point, we have created the project and we can see it in the file system, but it is not visible yet in Eclipse. In another tutorial, we'll examine how to import a maven project into Eclipse.

Create a simple project using Maven

Creating a mavenSW project is extremely easy using the maven archetype plugin. Information about archetypes can be found athttp://maven.apache.org/guides/introduction/introduction-to-archetypes.html. We can create a maven project using the "archetype:create" goal in the following manner.
mvn archetype:create -DgroupId=com.test -DartifactId=mytest
This command states to create a project called "mytest" specified by the artifactId. The project belongs to the "com.test" group, specified by the groupId. This group specifies essentially where the project is located hierarchically in a maven repository, and it allows for the grouping of similar projects into similar groups.
Now, I'll run the "archetype:create" goal at the command prompt.
'mvn archetype:create -DgroupId=com.test -DartifactId=mytest' at command prompt
This is the first time I've run the command, so maven will download the resources that it needs from the central repository to my local maven repository. When the goal finishes, we can see that the "mytest" project was successfully created.
'mytest' project successfully created
If we go to Windows Explorer, we can examine the project that we just created. I ran the goal in C:\dev\test, so the "mytest" project was created at C:\dev\test\mytest.
'mytest' project created at C:\dev\test
Notice that mytest contains a set of directories. The src/main/java directory is the default JavaSW source directory for maven projects. This is where you typically place your source code. This directory location is configurable, but in general it's best to stay with the maven defaults unless you have a very compelling reason to change them. Notice that the com.test package structure was created within src/main/java, and that an App.java file was created in src/main/java/com/test. This is a simple HelloWorld-style class.
Sample JUnit test created
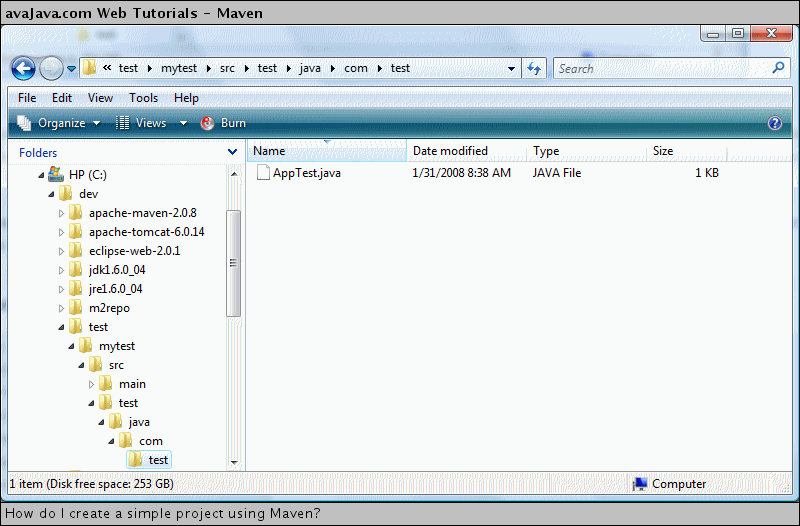
The src/test/java directory is the default location for JUnit tests, which are integrated into the maven lifecycle. The com.test package structure was created within src/test/java, and a simple JUnit test class called AppTest.java was created in src/test/java/com/test.
Of great importance is the pom.xml file that was created in the mytest directory (the root level of the project).
pom.xml
The pom.xml (Project Object Model) file is essentially the project's metadata file that describes the various aspects of the project. It describes the project's name, group, version, dependencies, and many many other things. The contents of the generated pom.xml file are shown below.

pom.xml

<project xmlns="http://maven.apache.org/POM/4.0.0" xmlns:xsi="http://www.w3.org/2001/XMLSchema-instance"
  xsi:schemaLocation="http://maven.apache.org/POM/4.0.0 http://maven.apache.org/maven-v4_0_0.xsd">
  <modelVersion>4.0.0</modelVersion>
  <groupId>com.test</groupId>
  <artifactId>mytest</artifactId>
  <packaging>jar</packaging>
  <version>1.0-SNAPSHOT</version>
  <name>mytest</name>
  <url>http://maven.apache.org</url>
  <dependencies>
    <dependency>
      <groupId>junit</groupId>
      <artifactId>junit</artifactId>
      <version>3.8.1</version>
      <scope>test</scope>
    </dependency>
  </dependencies>
</project>
Notice that the pom.xml file features an XSD. This is extremely useful since it allows us to do things such as code-completion in a good XMLW editor, such as the one in EclipseSW.
The pom.xml file has some features worth pointing out. The "modelVersion" refers to which object model the POMW is using. You rarely need to be concerned with this value. The "packaging" refers in general to the type of package that we are building with this project (such as jarW, warW, or ear). The "version" element refers to the version number of that artifact that we are building into a package. This is the number extension that comes in a package file name, such as commons-blah-1.2.3.jar. The "name" element is the display name of the project, as opposed to the "artifactId", which is the artifact file name. So, a project "name" might be "The Blah Project" while "artifactId" might be "commons-blah". The "url" element is to specify the location of the project's "site". A "site" is the generated documentation for a project.
Also, note the junit dependency that's been included in the pom.xml file. The AppTest class is a JUnit test so the project requires the junit dependency.
That about covers it for creating a basic mavenSW project using the "archetype:create" goal.

link to my settings.xml file from Eclipse

If you work with MavenSW significantly, there's a good chance that you probably need to modify your settings.xml file quite often. If you are an EclipseSWdeveloper who does builds with Maven, it can be handy to provide a link to your settings.xml file from within Eclipse. In addition to convenience, Eclipse features XMLW code syntax coloring and validation, which can come in very handy when modifying XML files.
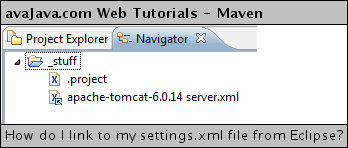
Typically, I like to link to several external files from Eclipse and have all these links in a convenient project. I like to create this project with an underscore at the beginning of its name so that it appears first in Navigator view. Below, you can see that I've created a General project ("_stuff"), and that it already contains a link to my TomcatSW server.xml file. The arrow icon in the corner of the icon indicates that this is a link to an external file.
Eclipse Navigator View
Let's add a link to settings.xml. To do this, I right-clicked the project and went to New → File.
New File
In the New File popup window, I clicked the Advanced button and clicked the "Link to file in the file system" checkbox. I clicked the Browse button and browsed to my settings.xml file that was located in my .m2 user directory and selected it. It's fine to change the "File name" if you'd like to, since this is basically just a label to the real file. I didn't change it in this example. When done, I clicked Finish.
Link to file in the file system
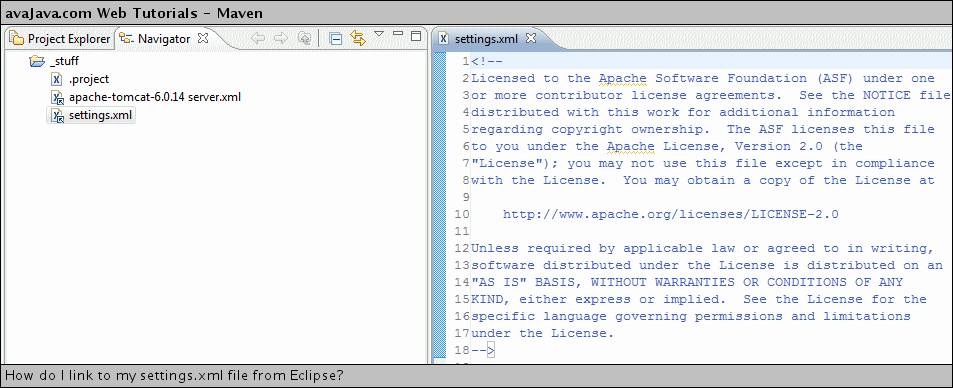
The settings.xml file now appears in the "_stuff" project. We can see it is a link to a file since we can see the arrow in the corner of the icon. If we double-click "settings.xml" it opens the external settings.xml file in Eclipse's XML editor.
settings.xml in Eclipse's XML editor
In this tutorial, we've seen how we can conveniently link to our settings.xml file from within Eclipse. In addition to convenience, we get the benefits of Eclipse's powerful XML editing capabilities.

How do I configure Maven for a user rather than globally?

MavenSW global settings for all users are configured using the settings.xml file in the mavenSW conf directory. To set settings for an individual user, you can create (or copy) a settings.xml file into the .m2 directory in your user home directory. This file will hold maven settings specific to that user rather than globally for all users on that computer.
The settings.xml file that comes with maven in the conf directory contains many useful comments, so I like to copy this settings.xml file to my .m2 directory. I installed maven at C:\dev\apache-maven-2.0.8, so my global settings.xml is located at C:\dev\apache-maven-2.0.8\conf\settings.xml.
global settings.xml file at C:\dev\apache-maven-2.0.8\conf\settings.xml
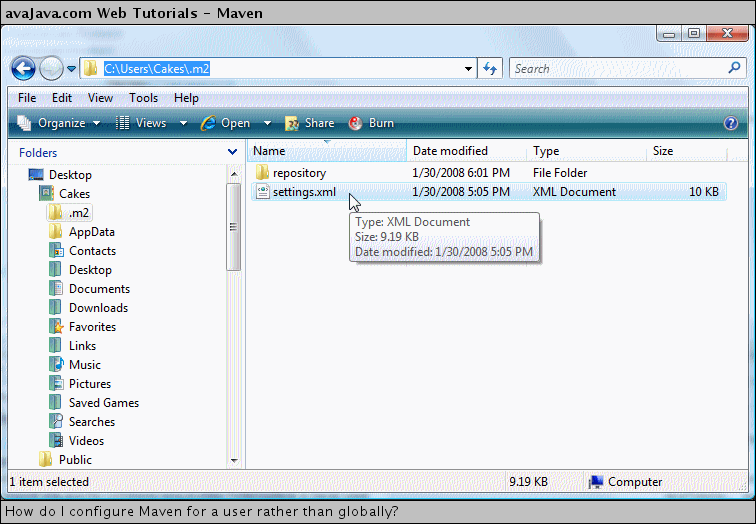
I copied this settings.xml and pasted it in my home directory's .m2 directory. This .m2 directory was created after I installed maven and ran a maven command, like 'mvn clean'. So, my path to my user settings.xml is C:\Users\Cakes\.m2\settings.xml.
settings.xml copied to C:\Users\Cakes\.m2\settings.xml
I can now make configuration changes to maven using this settings.xml file, which is specific to my particular user on my computer.

What is Maven and how do I install it?

MavenSW, located at http://maven.apache.org, is a great JavaSW project build and management tool from the ApacheSWSoftware Foundation. One primary focus of Maven is as a build tool, performing tasks similar to AntSW, although it's more like Ant on steroids.
A very significant aspect of Maven is the use of repositories to manage jarW files across different projects. In a simple software development environment, you may work on a project and check jar files directly into your project in your version control system, and you may do this in each project that you work on. This system works fine in relatively simple situations, but it becomes unweildy as projects grow in size, in complexity, and in their numbers of developers. In the Maven system, jar files are stored in remote repositories, and they are downloaded to your local machine to a local repository as needed. Typically, these same jar files are accessed across projects, and Maven makes it very simple to manage different versions of jar files, and to group together sets of related jar files. Building different types of projects (such as jars, wars, and ears) is handled very cleanly by Maven. Maven can perform tasks such as generate useful documentation about your project. The features of Maven go on and on.
Maven 2 is very significantly different from Maven 1. This tutorial will cover Maven 2.

To set up Maven, you need to:

  1. Download Maven and unzip it
  2. Create a JAVA_HOME System Variable
  3. Create an M2_HOME System Variable
  4. Add %JAVA_HOME%\bin;%M2_HOME%\bin; to your System Path

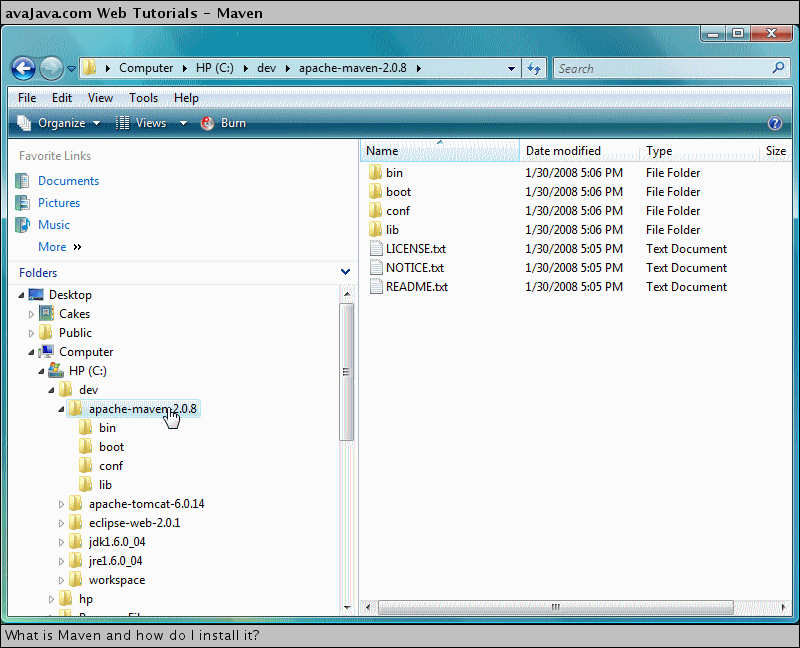
To begin with, download the latest Maven from http://maven.apache.org/download.html. I downloaded apache-maven-2.0.8-bin.zip and extracted it to C:\dev\apache-maven-2.0.8.
apache-maven-2.0.8-bin.zip extracted to C:\dev\apache-maven-2.0.8
Go to your System Properties → Environment Variables.
Environment Variables
Create a JAVA_HOME System Variable and point it to your Java installation. I pointed mine to C:\dev\jdk1.6.0_04.
JAVA_HOME System Variable
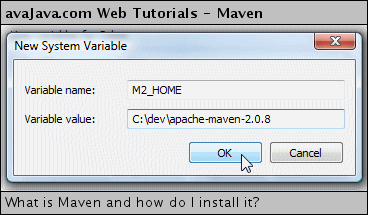
Create an M2_HOME System Variable and point it to your Maven installation. I pointed mine to C:\dev\apache-maven-2.0.8.
M2_HOME System Variable
You should now have JAVA_HOME and M2_HOME System Variables.
System Variables
Add %JAVA_HOME%\bin;%M2_HOME%\bin; to your Path System Variable. This puts your Java and Maven executables in the System Path so that they can be executed without their fully qualified paths.
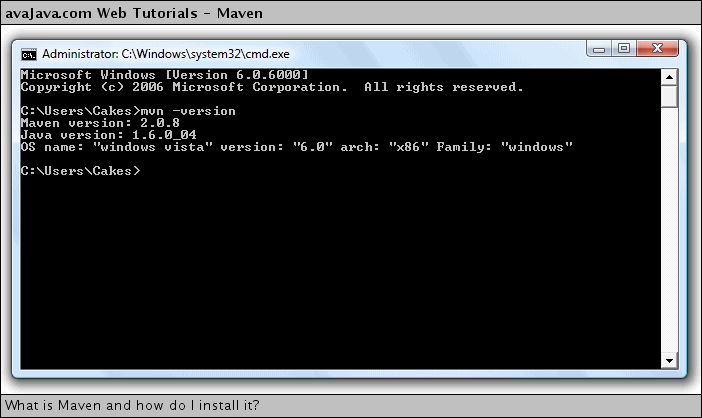
Open a command prompt window, and at the command prompt, type 'mvn -version'. You should see a message displaying the version of MavenSW and the version of JavaSW.
'mvn -version' at command prompt
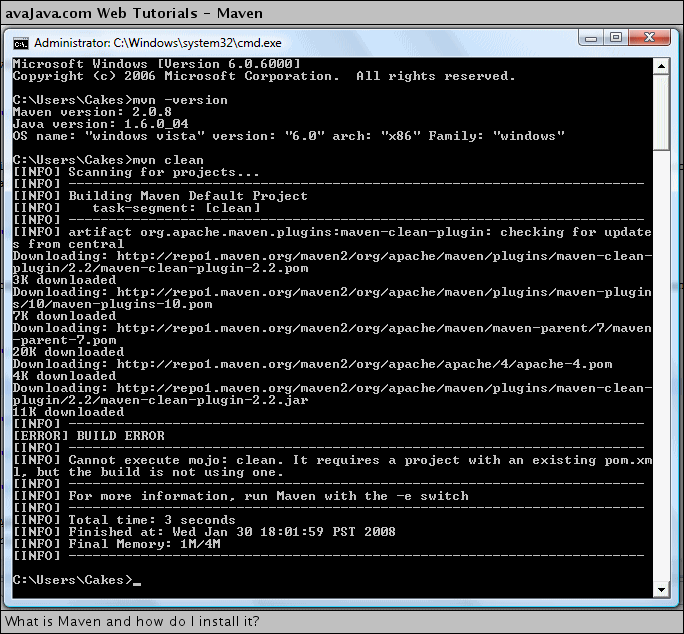
Next, at the command prompt, try typing a command like 'mvn clean'. You'll probably see that some jarW files downloaded from the Maven central repository to your machine. After that, we see a 'BUILD ERROR'. This message is fine. This is telling us that we ran the command but that there was no pom.xml file present in the directory where we ran the command.
'mvn clean'
After running the 'mvn clean', if we go to our user home directory (for me, C:\Users\Cakes), we can see that an .m2 directory has been created by mavenSW. Within .m2, we can see a 'repository' directory. This is the default location for your local maven repository. This local repository directory contains things such as the jar files that your projects use. In addition, it contains the jar files and things that maven itself needs. When we ran the 'mvn clean' command, we asked maven to do a 'clean' command, which requires the maven-clean-plugin jar file. If you look back at the command prompt output after the 'mvn clean' command, you can see that the maven-clean-plugin jar file was downloaded, since maven realized that it needed this jar file in order to do the 'clean'.
default .m2/repository created for local maven repository
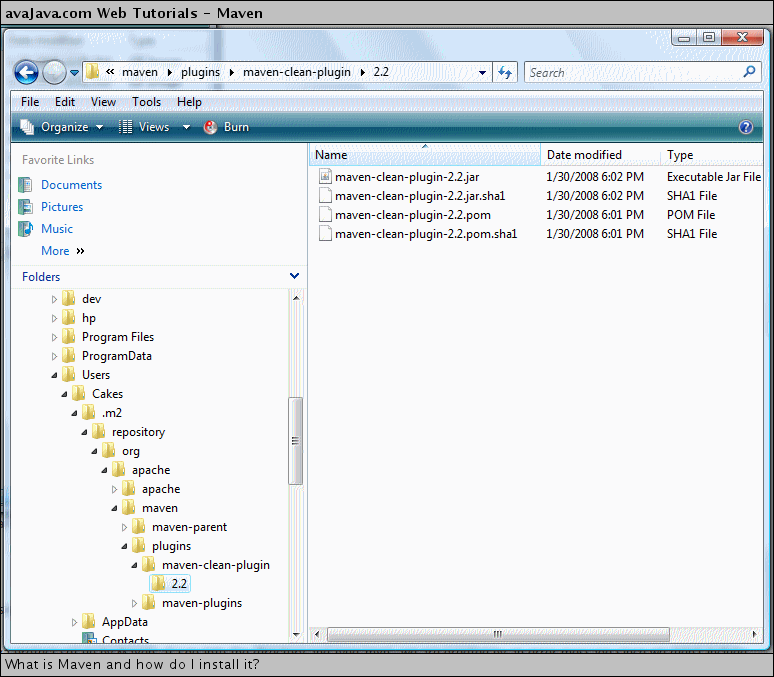
If we examine the contents of our local maven repository, we can see that it contains the maven-clean-plugin jar file. On my machine, the jar is located at C:\Users\Cakes\.m2\repository\org\apache\maven\plugins\maven-clean-plugin\2.2.
local maven repository contains maven-clean-plugin
Our Maven is installed and working. We can now get to work creating projects with this great tool.